This entry is part 1 of a 7 part series. To jump to a particular entry, you can click any of the following links:
Now that we have our processes planned out, we can implement them. But first, there needs to be a little work done on the back-end to support these processes...
The first thing to do is to create an admin account on your target server and use it to run the SQL Agent. Before I did this, The service was running under the LocalSystem account. I kept getting errors during the copy processes (because it was trying to access a network share that the account didn't have rights to), and once this was changed, it worked fine.
Create the Admin login (on source server and each target server)
- Open SQL Server Enterprise Manager
- In the Console Tree, expand the target server
- Expand the security folder
- Right click on the 'Logins' item
- Choose 'New Login...' from the context menu
- Enter the new login name or select your domain and press the elipse button (...) to choose a user (see figure 1)
- Select 'Windows Authentication' radio button
*Note - this windows user account must exist on the server
- Switch to the 'Server Roles' tab (see figure 2)
- Select each checkbox in the 'Server Role' checked list box
- Switch to the Database Access tab (see figure 3)
- Check the name of the Source Database in the top list
- Check 'Public' and 'db_owner' in the lower list
- Click the OK button
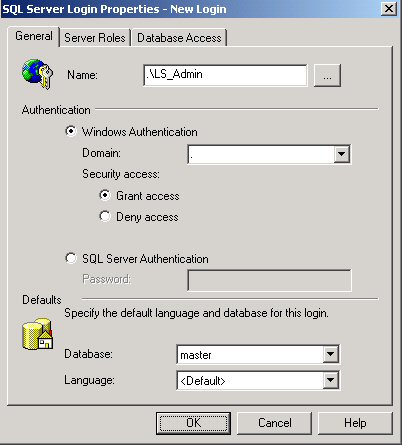
Figure 1 - SQL Server Login Properties (General Tab)
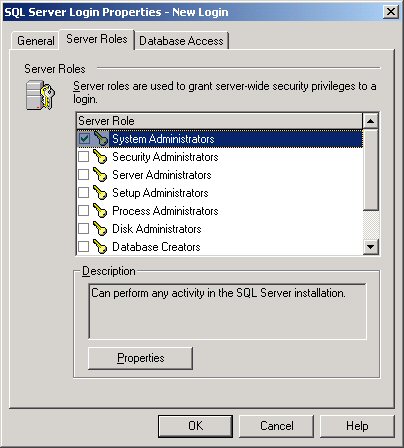
Figure 2 - SQL Server Login Properties (Server Roles Tab)
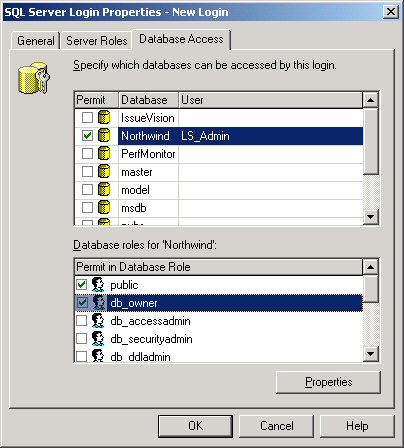
Figure 3 - SQL Server Login Properties (Database Accesss Tab)
Change the SQLAgent service to run under your new account (on source server and each target server)
- In SQL Server Enterprise Manager, expand your server in the Console Tree
- Expand the Management folder under your server
- Right click on the 'SQL Server Agent' item in the list
- Choose 'Properties' from the context menu
- On the 'General' tab, in the 'Service Startup Account' area, choose the 'This Account' radio button (see figure 4)
- Enter your new account name
*Note - if you're on a domain, the account name should be {Domain}\{Account}. If you're not on a domain the account name should be .\{Account} (the period and slash are necessary)
- On the Connection tab, make sure the 'Use Windows Authentication' radio button is selected (see figure 5)
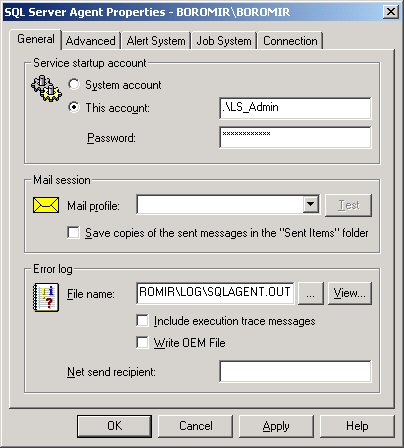
Figure 4 - SQL Server Agent Properties (General Tab)
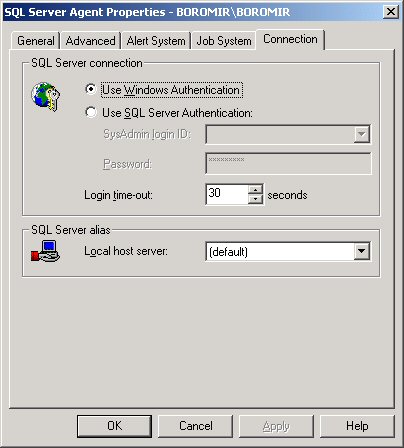
Figure 5 - SQL Server Agent Properties (Connection Tab)
The next thing to do is to create the necessary folders and sharing options on your servers. When the SQL Agent backs up the transactions, the trn file will be saved to a folder on the source server by a SQL Agent job on the source server. At specified intervals, a SQL Agent job on each destination server will check the folder on the source server and copy any new trn files to a local folder. The trn file is basically a list of all transactions that occurred in the database since the last transaction backup was done.
Create the directory you specified in question 9 (SQL Server - Logshipping Part 2 of 8) on each of your target servers.
Set permissions on your new folder
- Navigate to the new folder
- Right click on the folder and choose 'Properties' from the context menu
- On the 'Security' tab, add the account you created above to the list of users with rights to this folder
- Click the "Add..." button next to the list
- In the popup dialog, choose your new account from the list
- Click the "Add" button in the popup
- Click "OK" in the popup
- Once the popup is closed, select your new account name in the list of users with rights to this folder
- Check the "Full Control" checkbox under the "Allow" column in the Permissions list (see Figure 6)
- Click OK
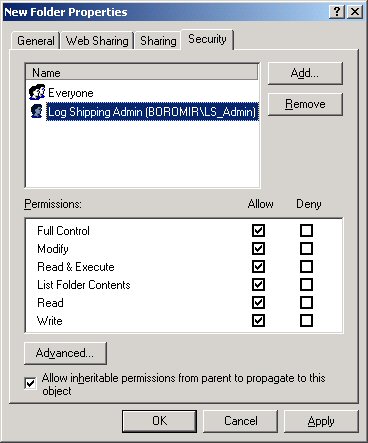
Figure 6 - Folder Properties (Security Tab)
Now your target servers are set up.
Create the directory you specified in question 6 (SQL Server - Logshipping Part 2 of 8) on your source server.
Create a network share and set permissions for the new folder:
- Navigate to the new folder
- Right click on the folder and choose 'Sharing...' from the context menu
- Choose the 'Share this Folder' radio button (see Figure 7)
- Specify a Share Name for this folder (Remember this... you will need it later)
- On the 'Security' tab, add the account you created above to the list of users with rights to this folder
- Click the "Add..." button next to the list
- In the popup dialog, choose your new account from the list
- Click the "Add" button in the popup
- Click "OK" in the popup
- Once the popup is closed, select your new account name in the list of users with rights to this folder
- Check the "Full Control" checkbox under the "Allow" column in the Permissions list
- Click OK
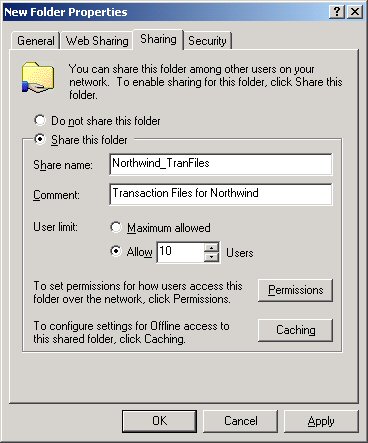
Figure 7 - Folder Properties (Sharing Tab)
Ok... now we're done prepping the servers. In my next entry I'll show you how to create and schedule a maintenance plan.
Chris Antoniak DBA/Developer