Monday, March 20, 2006
infotec 2006 in Omaha, Nebraska is only the second trade show that Genesis has ever participated in. infotec (by the way it supposed to be spelled with a lower case “i”) is more along the lines of an IT trade show that the Big O show where there really is no specific field of focus. Therefore we want to take it up a notch as far as how Genesis comes across to our booth visitors. We have signed up as a corporate sponsor of infotec this year, so looking amateur is not an option.
In this regard we enlisted our marketing firm, Omegapoint, to help us be sure to look good at the show. It is at this point that we were amazed by the amount of budget it would require to simply get our hands on some nice booth displays like basic counters and workstations, let alone bannerage. So, being the control freaks that we are we decided to encounter on the journey to build our own “props”, this to the dismay of the marketing firm. A side issue to our apprehension to spending the coin outlined by the marketing company was the overall flex in the range of prices on the displays and other supporting show collateral.
BJ, the owner, and I have long dabbled in woodworking, so after perusing many sites that showed options for booth furnishings we decided on the main items needed to give the booth a good foundation.
I drew the booth to scale allotting room for all the booth content planned. The booth was a 20’ by 30’ island, so we had all sides exposed to the public, and no back wall to hide junk behind.
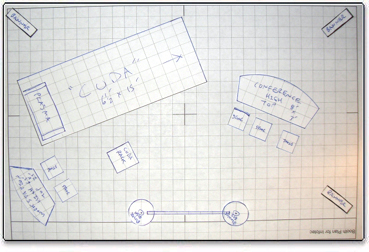
The main pieces to be constructed were a large curved bar height conference counter, a smaller curved bar height workstation counter, and a main banner support structure. The main banner was going to be large and impressive, 6’ wide by 8’ tall and needed to be high enough up so as to allow people to walk under it. This placed the overall height of the main banner structure at about 16’.
So, here is a photo montage of the process of building the props:
Drawing large curves is not as easy as it looks, at least to do it and get it accurate. We devised a contraption that used two strings to hold a pencil in an upright position and anchored the other ends of the string to a center point to make a large compass. We found that drawing circles made us very thirsty.
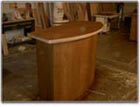
Large curved top roughly completed… 
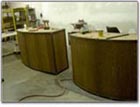
The bases of the bar height units were to double as a place for storing our show junk like t-shirts and golf-balls as well as securing such things as laptops and what-not after hours.
Roughly completed workstation unit with removable top and based assembled. Doors on the backs would lock so as to secure certain items.
Stained,
then trimmed in oak stained black,
then assembled for a polyurethane finishing.
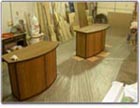
Allowing the polyurethane to dry, phwew! These babies are just about done, now we need to move on to figuring out the main banner structure build.
The main banner structure was of concern because of the height. We were concerned that because of the height we may have a stability issue. Therefore we “overbuilt” the bases and additionally made the tops removable so as to be able to put sandbags inside the units to create ballast.  The plan worked great! By the way, power tools are dangerous and care needs to be used when using all power tools, even things as seemingly inert as a dust collection system.

Additional concern was what to use to create the two mast s that would go 16’ vertically and look and feel solid. We finally decided on a high grade PVC piping, which turned out to be 4” well casing pipe purchased from the great folks at Central States Distributing. It’s always interesting when someone at a place like Central States asks you what you’re doing with something like this and you try to describe building a 16’ banner support structure.
After purchasing the pipe, we needed to consider what product to use to finish the piping so that it would look great. We ended up using black auto motive paint with a matte finish that we purchased from Redshaw Paints in Omaha. Again, you just can’t describe the look on people’s faces when you are trying to describe “yah, we want t o paint a couple PVC pipes for a trade show display, and yah, we pretty much know how to work with automotive paints ‘n’ stuff, really we do…”. The guys at Redshaw honestly thought we were there trying to sell them something or trick them into something, pretty dang funny. How do you paint 16’ long pipes that need to be painted on all sides? We suspended them from the roof by using long chains to run through the pipes and up to the roof beams. This allowed us to paint all sides and rotate the pipes as we painted them to get all surfaces evenly.
Care must be taken so as not to get too busy working and wind up building one of your children into your proje ct. We are not sure how Jonathan ended up inside the unit; we may have been using him to sand the inside of the box. Here Jonathan shows off the massiveness of the main banner structure.
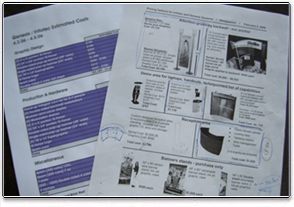
Cost of building and owning the displays:
| Wood materials |
$1200.00 |
|
Misc
(stain,sandpaper,poly, bandaids)
|
$ 200.00 |
| Hardware |
$ 150.00 |
| PVC Pipes |
$ 370.00 |
| Automotive Paint |
$ 170.00 |
|
$2090.00 |
| Total |
$2090.00 |
|
|
| Build time and satisfaction |
Priceless |
Cost of renting for onetime 2 day use:
| Large conference unit |
$1600.00 |
| Smaller workstation unit |
$1100.00 |
| Main banner stand |
$1100.00 |
|
|
| Total |
$3800.00 |
Look for more pictures of the finished products staged and also at our booth at the Qwest Center for infotec in future blogs.
Brad Williams
Operations